Copyright © The Minimalist Chef
Design by Dzignine
Monday, September 3, 2012

Roasted Cornish Hens

Who doesn't love a crisp, savory, and warm roast chicken for dinner?  Especially with roasted potatoes and mirepoix (that's diced celery, onions, and carrots) drizzled with olive oil and white wine.  For dinner tonight I've prepared three Cornish hens, and I've already caved and eaten some - they're absolutely delicious!  Even better, they only take about 15 minutes to prepare, then you just put them in the oven for an hour and you're done!

What are Cornish hens?
Cornish hens are young chickens, around 28 days old, that are a hybrid of the Cornish breed of chicken, and any other type of chicken.  Because of their young age, they are tender and moist.  They're a bit pricier than normal roasting chickens, but they are certainly worth the extra dollars!

Ingredients: 


  • 2 or more Cornish hens, washed, dried, and gizzards removed.
  • 4 Potatoes, peeled.
  • 2 Large onions
  • 1 Carrot, peeled
  • 2 Celery stalks
  • 1 Lemon, halved.
  • 1 Tablespoon dry thyme
  • A dash of white wine
  • Olive oil
  • Salt and freshly ground pepper to taste


I recommend a large roasting pan as showed in the picture below to roast your hens and vegetables in.  It allows for all the vegetables to be exposed on one side so they can brown and get all delicious and flavorful. (I just LOVE crusty brown bits on my potatoes!!)

Pre-heat oven to 400 degrees Fahrenheit. 

Start by peeling and dicing all of your vegetables.  We want a medium dice, nothing too small, or too big.  We're looking for a nice texture, something that will lend to a nice mouthfeel with a bite of chicken.  

Throw all of your veggies in the roasting pan, drizzle with a few tablespoons of olive oil, and season liberally with enough salt and pepper to give them flavor; be careful not to over-do it on the salt.  One thing that can ruin a dish instantly is over-salting.  The opposite is also true - dishes will also be lackluster if you under-salt, so just be sure to get the proportions correct.  Sprinkle with 3/4 of the thyme, and save the rest for rubbing on the chicken. To really kick the veggies up a notch, put a splash of white wine in - it REALLY gives a nice, fruity flavor. Toss to combine the veggies and seasonings.

Stick one half of a lemon in the cavity of each chicken.  Next, rub a bit of olive oil all over the chicken, enough so that all of it is covered, but not dripping.  Sprinkle the rest of the thyme on top, and season with salt and pepper.  

And that's it!  It's so simple, and only takes about 15 minutes to prep (mostly cutting the veggies).  Stick it in the oven for one hour.  After one hour has elapsed, flip the hens and roast for 10 minutes.  Flip them one last time so they are right side up, and roast for another 5 minutes. 

After you take them out of the oven, LET THEM SIT!  I cannot stress this enough.  Meat needs a good 10 minutes to set after it has been taken out of the oven or off the grill for the juices to settle. If you cut into it now, all of those delicious juices are going to leak out!

This is a delicious and easy recipe to make that can feed 4-5 people easily.  The potatoes are crispy and brown, the onions get a bit caramelized, and the white wine gives them all a great fruity flavor.   
Feel free to comment with requests of recipes that you would like to see.

Signing out,
The Minimalist Chef


Tuesday, August 28, 2012

Quick and Healthy Snacks to Munch On


If you are someone who is looking to lose weight and stay in shape, you need to think about what you are eating. The truth is that starving yourself is never the key; if you want to lose weight and keep it off, eat often, but choose foods that keep your energy up and your calorie count down!
Fruit
You can’t go wrong with fresh fruit. Fruit is sweet and it gives you some sugar to burn for more energy. While you might love the idea of keeping plenty of apples and pears on you, you may find that this is inconvenient. As a substitute, consider keeping boxes of raisins on hand to make sure that you don’t start starving. If you prefer fruit like melons, consider chopping up a melon, leaving the pieces in your fridge and then eating a piece or two throughout the day. This is a good way to make your snacks fast but healthy.

Cheese
Though cheese is considered to be fairly fattening, the truth is that it is fine in small quantities. Keep a few low-calorie cheese sticks on hand. Skip the ones with battering, and instead choose the ones that are packaged to be part of your lunch. Cheese is a protein that will keep you running when you are tired, and if you eat it after a workout, you’ll find that it helps you gain muscle.

Nuts
Whether you love peanuts, macadamia nuts or almonds, you’ll find that nuts give you a great snack. While plain nuts are often the best for you, don’t shy away from nuts that have been salted or roasted in honey. The key is to have a low-fat snack that leaves you filling satisfied. For example, salted peanuts are much healthier for you than potato chips, which are a common choice for people who want to eat something salty.

Salsa
Keep a jar of salsa in the fridge along with a bag of low-calorie baked chips. Salsa is a fairly good source of vitamin C when you are in a hurry, and the contrast in flavors between the chips and the salsa help you feel as though you have had a full meal. Salsa comes in many flavors, and if you want to skip the preservatives, it is very easy to make at home.
Consider what you have been eating lately, and think about whether you could improve on it. There has never been a better time to make a commitment to eating better, so choose snacks that you know are healthy for you!

This post was contributed by ezCater.com. For more information and to find and order Auburn catering visit ezCater.com.
Thursday, August 23, 2012

Kitchen Helpers: Some of the Most Useful Kitchen Equipment

The kitchen is a great place to be these days, especially due to the range of interest that there is nowadays in good, quality cooking due to the range of great television cooking programs and interest in fresh ingredients.
Cooking quality fare is one of the greatest things in life and frankly eating it probably is the best thing in life. The relationship we have with the food we eat sums us up in so many ways on both physical, social and interest levels. For many of us, the kitchen is a great place to be and so here are some great gadgets that can make all the difference when in front of the stove, rustling up a salad or in the throes of experimentation all thanks to Rice Homewares.

The Tomato Press

This item is the best in the world for turning tomatoes into those beautiful and juicy fresh sauces that we eat when on holidays. Unlike the pre-packaged food we get these days, which is often still quite fresh, there is still something special about making your own sauces. The press looks like something you would use for grinding meat and all you do is turn the handle to get the best from the little or large tomatoes. It removes the skin and seeds and allows the pulp to enter the bowl alone, meaning you get fresh quality tomato sauce right from the source.

Herb Keeper

One of the biggest issues for those who love the kitchen is how to keep herbs at their best and a good herb keeper is the key. This gadget from Rice Homewares immerses the herb’s roots in water and allows them to be replenished for weeks and so maintain their strength and also keeps them fresh for a long period of time. As fresh herbs beat dried any day of the week, this is a great gift for those who love the kitchen.

Ginger Grater

One of the greatest of all herbs is ginger. The amazing flavour of this herb is so versatile and can be used in a wide range of foods and drinks. Add to this the fact it is good for your stomach and you need a good grater for it. Ginger graters have sharp teeth and collect ginger when it is grated off them. They are also made from aluminium coated in rust proof materials and so are easy to clean, don’t rust and also are great for resisting bacteria.

Grill

Whether you have an oven or a pan, you need a grill and a good frill can make all the difference to the fat levels in food and health. From Rice Homeware’s stock to the George Foreman health grills to grill racks, these items area must have and allow you to create a range of great foods you may not have been able to before such as stuffed vegetables and kebabs among other things. Fortunately like everything else here they are low in price and make all the difference in the kitchen to those who love cooking.

At Olive Loves Alfie you can find great equipment for your kitchen, such as the Rice Homewares series.
Wednesday, August 22, 2012

The Essence of a Blueberry Muffin

You are trying to decide what to serve your unexpected guests to eat and are scrambling throughout your kitchen, trying to think of the best solution for this immediate situation. Even though most people may think of grandiose dishes or even ordering out, you really do not need to look any further than making a nice batch of blueberry muffins. These delicious and easy-to-cook muffins, if done correctly, will be thoroughly enjoyed by all of your guests and have them coming back to you for more! How easy to cook are blueberry muffins? If you do not know already, then you are going to enjoy this article as we walk you through the process step by step.

The Ingredients

o Milk: ¾ cup of milk is needed for the purpose.
o Vegetable Oil: Vegetable oil is a pre-requisite in case of muffins. You need to have half cup of vegetable oil for making blueberry muffins.
o Eggs: Only one egg is required to carry out the intended task.
o Purpose Flour: Around 2 cups on average of purpose flour is needed.
o Sugar: Go with 1/3rd of a cup of sugar. Amount can be added or decreased according to requirement.
o Baking Powder: 3 Tablespoons of baking powder is required.
o Salt: Normally 1 tablespoon is the ideal amount, but can be varied according to taste.
o Blueberries: One cup of fresh blueberries is needed.
o Muffin pan containing twelve cups is required.

The Basics & the Benefits

Unlike with other dishes, time is definitely on your side when it comes to blueberry muffins. You really will only need 4-6 minutes to prepare the muffins and between 15-18 minute to bake them. Since the ingredients are not expensive at all, blueberry muffins are the most economic choice for a nice dish for your friends and family to share. Since blueberries are rated as the healthiest and finest berries available, these muffins also make healthy alternatives over unhealthy and fattening baked goods, such as cookies and cake.

How Do You Cook the Muffins?

You need to start by pre-heating the oven to a temperature of about 400 degrees. You should grease the bottom part of the pan. This way you can prevent the pan from getting sticky. After getting the pan ready, you need to beat the egg, milk and oil together in a bowl. After all the three ingredients have been mixed properly, you need to stir in the salt, sugar and baking powder. You have to stir until the mixture gets lumpy. After the mixture is ready, you have to put the mixture, which should be moistened, into the cups, i.e. the muffin cups. Filling should be done evenly to give a pleasant look and distribute the mixture equally. After filling is done, 15-20 minutes of baking is enough, which would result in a brown color.

The Perfect Solution

Blueberry muffins are easy to cook and a treat to eat. Since you now know the proper way of making and baking them, you will no longer be stumped when you hear the doorbell unexpectedly with people that you care about.

Videojug is a how-to video tutorial website with everything from how to make blueberry muffins to planting a tomato tree.
Tuesday, August 21, 2012

How to Save Money on Groceries


How to Have All of Your Favorite Foods at a Fraction of the Price
It’s that time of the week. The cupboards are bare and it’s time to go food shopping to replenish your stocks. You’ve already prepared a budget and have carefully planned your shopping list so it doesn’t break the bank. However, in the cash strapped times we all face at the moment, you’re wishing there was a way to save even more money on your shopping; a way where you don’t have to compromise on buying the brands that you love. If that sounds anything like you then the good news is there is a solution…
It’s All To Do with Dates
The answer to cheaper food is one that is slowly emerging from secrecy to provide considerable savings to households everywhere, and it has everything to do with those things we call ‘best before dates’. Every supermarket throws away food when it is approaching its best before date.
The best before date, however, does not mean that the food cannot be consumed after this time. It is merely a guide that is used to ensure quality control. Around one third of all the food produced is wasted because it is not purchased before the best before date. This food is still perfectly fine to consume, and companies have been busily selling food that’s passed its best before date to happy consumers everywhere.
How do I know it’s safe to eat?
Well, the great thing is you don’t have to take my word for it. Instead, you have confirmation from the horse’s mouth…also known as the Food Standards Agency (FSA). The guidelines set by the FSA state that it is perfectly fine to consume food after the best before date. In many cases, this foods tastes exactly as it would before the best before date, with only a minority of foods losing some of their original texture or flavour.
The only food product that needs to be consumed on or prior to the best before date are eggs. Every other food is completely safe to eat all the way until its ‘use by’ date. It is only the use by date that you should pay close attention to, and it is after that date only that food should be thrown away.
So, how can I save money?
The fact that food is still fine to eat after its best before date means that it is still fine for companies to sell this food. Because of this, businesses have formed that are buying food approaching the best before date at a reduced rate. They are then passing these savings on to you in the form of cheap food items, keeping that bank balance happy.
Many of the foods can be found with up to 75% off of their original retail price. So, if you’re usually spending around £100 per week on your food shopping, then you can realistically still buy all of the same foods and only spend around £25 – £30. Don’t be one to let the best before dates faze you and join the thousands of others who are making considerable weekly savings on their food bills.
Stuart Withers is a copywriter and money saving pro. He’s been actively consuming food after its best before date for a long while now and is happily reaping the rewards of a satisfied wallet. If you want to see how you can reap the rewards too, then he recommends heading over to Food Bargains, where you’ll find a whole range of quality, branded foods at a fraction of their original price. If you want food for less, then check them out today!
Monday, August 20, 2012

Ridiculously Addictive Cookie-Brownies!

I saw a picture on Pintrest a few days ago of a cookie-brownie.  As you might assume, a cookie-brownie is literally that - a brownie recipe with cookie dough dotted on top, and then baked to fuse into one awesome creation.  I just HAD to make them, because it's not like I had any summer work to procrastinate on...oh wait, I have two calculus packets to finish for my summer class.  That's exactly what I wanted to be doing on a Saturday afternoon, right? 

I must implore you to make these brownies.  They only take about 20-25 minutes to prep, and then 35ish minutes to bake, so roughly an hour in total.  That is NOT a lot of time for such a delicious, fattening, stuff-your-face brownie recipe!


Cookie-Brownies:
Makes about 25 brownies, depending on how you cut them.

Brownie Ingredients:
  • 1 1/4 cup sugar
  • 2 eggs (replace with 1 cup applesauce if vegan; but if you're vegan, you won't be making these anyway...)
  • 1/2 + 1 tablespoon unsweetened cocoa powder
  • 1/2 cup butter
  • a splash of pure vanilla extract
  • 1/2 cup flour
  • 1/4 teaspoon baking powder
  • a pinch of salt (optional, though highly recommended)
  1. Preheat oven to 350 degrees.
  2. Mix eggs, sugar, and vanilla in a large bowl.
  3. Microwave butter until melted, and stir into bowl.
  4. Stir in the remaining ingredients until smooth.  Pour into a square pan.
  5. Wait to bake until the cookie dough is spooned on!
 
Cookie Dough Ingredients:
  • 2 cups all-purpose flour
  • 1 teaspoon baking soda
  • 1 cup room temp. butter
  • 3/4 cup + 1 tablespoon granulated sugar
  • 1/2 cup semi-sweet chips
  • 3/4 cup packed brown sugar
  • a splash of pure vanilla extract
  • 2 eggs
  1.  Beat the sugars, eggs, and vanilla extract until creamy and smooth. 
  2.  Combine flour and baking soda.  Slowly add to the creamed mixture.
  3.  Fold in the semi-sweet chips.
  4.  Spoon tablespoons on top of the brownie mixture, spacing evenly.  Make sure the entire surface is covered.
  5.  Bake for 40 (give or take 5 minutes) minutes at 350 degrees.  Use a toothpick to see if it is done or not!  If it comes out clean, it is done!  

I hope you enjoy these delectable treats as much as I did! They sure are delicioso; c'est magnifique!

Enjoy!
The Minimalist Chef

Sunday, August 19, 2012

Chocolate Mint Tea - David's Tea, Upper East Side

The past weekend I was in Manhattan with friends on a food-splurge.  We ate almost everything under the stars - soup dumplings from Joe's Shanghai,  delicious chocolate from the Bald Man (Max Brenner's), unlimited, delicious breadsticks from Olive Garden; fried pizza from some random restaurant on the West Side, and finally, chocolate mint tea from David's Tea, in the Upper East Side.

Now while the loose-tea community ABHORS Teavana for a plethora of reasons, they don't seem to have any qualms about David's Tea.  In fact, I hadn't even heard of it until we stumbled upon the little storefront.  When you walk inside, you notice the neatly organized, colorful canisters of loose tea arranged on the side walls, and the clean, white walls.  This all screams "modern" to me, and while I like modern restaurants and stores, a tea store should not be modernized.  The art of making tea is an ancient ritual, and modernizing it has taken away some of the feeling that one gets when they brew tea.  Teavana especially has fallen to this, with their exotic "designer" teas, such as their Blackberry Mojito green tea.  For what reason does a good green tea need to be boggled down with disgusting flavors that mask the taste of the tea?  The answer is probably because the tea is of poor quality.

So I ask the woman in David's Tea which is their best selling tea.  She points to a canister on the wall that says "Kiss My Lips."  Now at this point I was wondering if she was trying to initiate something romantic, but I used my better judgement and just opened the canister and smelled the tea.  It smelled of chocolate and mint.  Looking at the actual leaves, I was able to see that it was a black tea, which one might say is not usually...well...MY CUP OF TEA.  There were little red kisses in the leaves that were cute, and gave it some color.  I decided to buy it.

Blogger is not cooperating and won't let me add a photo of the tea, so you'll have to look it up instead!  It's called "Kiss My Lips."  I'm sure Google Images has a picture of the tea leaves.

So I get home and try brewing it.  I tried four minutes because black tea usually brews for a solid four minutes.; I was REALLLLY not in the mood for bitter tea (when IS anyone ever in the mood for bitter tea?).

The tea smells absolutely amazing; in fact, I would probably use it as an air freshener around my house.  Unfortunately, it smells a lot better than it tastes.  It has very little tea flavor, and mostly tastes of chocolate and poor-quality mint.  I finished the tea-pot because I was really in the mood for tea but didn't feel like making another brew, but it was not very enjoyable.  And to top it off, black tea contains a decent amount of caffeine, so I stayed up for an extra hour.

Overall review:

David's Tea Store: Nice looking, the people were helpful.  They didn't have any pure teas though, only "designer" blends.  I wouldn't come here unless I was out of loose-tea and had no other place to get it. 3/5

Chocolate Mint Tea:  Had no taste of tea, only chocolate and mint.  Smells amazing, but isn't really a good tea.  2.5/5

I hope you enjoyed this tea review, hopefully I'll get my hands on some more unique tea and critique it for you soon!  Please comment if you have any recipe suggestions, questions, or ideas!

Signing out,
The Minimalist Chef
Wednesday, August 8, 2012

Tea Demo/Review - Rooibos Organic African Nectar

Lately it's been a ritual of mine to come home after a long day and brew a kettle of tea.  I found a great website where I get most of my loose tea from, Mighty Leaf.  In my last purchase from them, I ordered the Rose Silver Needle which is a beautiful, smooth white tea that tastes of freshly bloomed roses.  I liked it so much that I went through the 4 oz. bag in two and a half weeks.  I highly recommend it to anyone who wants to start drinking tea; it's a great beginner tea.

I also ordered their Organic African Nectar which is a rooibos (red African tea) with hints of blossoms and fruit.  It has a deep orange color, and a fantastic taste to boot, with almost no bitterness.  Rooibos tea is special because it isn't tea at all.  Real tea must include camellia sinesis leaves, and rooibos tea does not.  Rooibos tea is also known as red tea or redbush tea.

 Drinking tea supposedly has health benefits, though I don't drink it for those benefits - you never know what study is going to come out saying that tea is actually poison.  I drink it because it's calming and a fun ritual; if there are health benefits, those are just extra whipped cream on top!

How I Brew Tea:

I use the measuring tablespoon included in the tea pouches to measure the two tablespoons that I brew.  I then boil enough water to fill the teapot 3/4 the way up, and pour it over the basket infuser into the teapot, then stir to make sure all the leaves are submerged.

It's extremely important to use an infuser that is large enough to let the leaves expand and grow while infusing.  Don't use one of those mesh ball infusers, they are too small to fit enough tea and still have room to expand.  I found this cheap basket infuser online for under $5 a few months ago, and it's worked greatly.

All teas have different steeping times, and I can't stress how important it is to not over-steep your tea.  There are few things in this world worse than over-steeped tea, namely burnt caramel and spoiled milk!  But seriously, I IMPLORE you to follow the steeping directions "to a tea" as the tea producer states.  This rooibos steeps for 4.5 minutes. 


I hope you enjoyed this tea review and demonstration!  Try some loose-leaf tea, not any of that bagged garbage, and I'm sure you'll be impressed.

Please feel free to request recipes in the comments below, or offer any thoughts you may have.


Signing out,
The Minimalist Chef

Tuesday, August 7, 2012

Viva España! Welcome home, The Minimalist Chef!

Oh, hi, Blogspot!  It's been awhile, hasn't it.

On August 1st my time was up in Spain, and I had to get on the plane to return to the USA.  Throughout all the places I traveled through in Spain, fantastic cuisine was shoveled into mouth by the spoonful at every meal.  I was even able to bring back some cheap, exotic spices: saffron, rose petals, star anise, and some very good quality olive oil.  I'm very excited to be able to integrate these into my recipes for the blog!

Unfortunately I don't have a recipe to post today, but tomorrow I have a fantastic tea brewing demonstration and a review of one of my favorite teas.  But please, enjoy the following pictures from my trip to Spain!  If you have any recipe requests or questions, please feel free to comment! 

Adios! Hasta mañana!


Bull fighting ring.


Yummy dessert!  It was a flan covered in a chocolate gelatinous...covering.  Absolutely delicious!

Much of Spain's architecture is heavily influenced by Muslim architecture, as seen here in La Alhambra.


Sunday, July 1, 2012

Caramel - Bananas Foster

Who doesn't love caramel?  Caramel is a delicious mix of butter, sugar (brown or superfine white), water, occasionally cream, and a sprinkling of sea salt.  Caramel is pretty simple to make, but in a matter of 30 seconds, a good caramel can burn and become a bitter mess.  The recipe we will be making today will be using a wet caramel, which is made by using the above ingredients and water to stabilize the caramel and to prevent it from burning.

Bananas Foster:
Ingredients:

-2 under-ripe bananas
-1.5 cups brown sugar
-1/2 cup of water
-3 tablespoons of butter
-liquor of your choosing (I used a 44, though Rum is the classic)
-vanilla ice cream
-A pinch of sea salt

  1. Melt 3 tablespoons of butter in a saucepan, along with 2 tablespoons of the liquor. 
  2. Add the brown sugar and water.  Mix until combined and let simmer on medium-high until it comes to a boil.
  3. Once boiling, lower the temperature to low. Cut the bananas into half inch slices into the saucepan.  Let cook and reduce for two minutes or until at the desired consistency (not too thick, still runny.)
  4. Add a pinch of sea salt in to the caramel and banana mixture and stir to combine.
  5. Scoop some vanilla ice cream into a bowl or a glass.  Pour over the slightly COOLED caramel and banana mixture and ENJOY!
Tuesday, June 26, 2012

Fresh Homemade Pasta

Do you prefer pasta from an exquisite Italian restaurant or the dried, boxed pasta that you use at home?  Chances are, you prefer the pasta from the restaurant.  While not all restaurants make their own pasta, it is actually more economical in large batches; it also tastes one-hundred times better than boxed.  It's quite simple to make a delicious pasta from only four ingredients and about 45 minutes of work.  Before we get into the creation of pasta, let's talk about gluten, which occurs naturally in pasta and breads.

What is gluten?

Most people have no real clue as to what gluten is, but still preach that gluten-free diets are superior to any other.  This is not only wrong, but also shows that people are willing to believe anything that is shoved down their throats by the media and tabloids.  But I'm not here to get into a debate over how much gluten is in your diet; I'm here to simplify and explain the mysterious protein.

Gluten is a protein formed in doughs, breads, and most flour containing foods.  It's formed by glutenin bonding with gliadin in doughs.  Gluten is what gives dough its elasticity and stretchability, as well as giving breads their web-like form when you break them open.  It is essential in breads, pastas, and cakes to give them form and structure.  When a dough is kneaded, glutenin is moved around in the dough and "finds" gliadin, bonding with it.  When working with pastries, cupcakes, and other desserts, it is essential to not overwork your dough as to form too much gluten.  Pastries are supposed to be flaky and delectable, and forming a lot of gluten will make the pastry hard, brittle, and tough.

Pasta Dough

Pasta dough is EXTREMELY simple to make, once you get the (pretty easy) technique down.

Pasta Dough: makes about 2 cups of pasta.

Ingredients:
  • 2 large eggs
  • 2 cups all-purpose flour
  • 2 tablespoons extra-virgin olive oil
  • a pinch of salt
  1. Pour your 2 cups of flour onto a cutting board or onto a counter top.   Make a well in the middle.
  2. Crack 2 eggs into a bowl and whisk them with the olive oil and salt.  (Alternatively, you could crack the eggs directly into the well.  Messier and more difficult, however.)
  3. Pour the egg mixture into the well formed by the flour.
  4. Using a fork, take some of the flour from the sides of the well and whisk with some of the egg mixture.  Continue this until you have a smooth dough that isn't sticky and workable by hand.
  5. Knead by hand for about 10 minutes, or until the dough is extremely smooth and springy.  Knead into a ball.
  6. Rub some olive oil all over the ball and cover it with saran wrap and let sit for 40 minutes.  This will allow the gluten to relax and make the dough easier to work with and cut.
  7. Roll dough into a 1/16 inch flat piece.  Cut linguini, or cut circles and fold into little shells.  The possibilities are endless!
  8. Let the cut pasta dry for two hours, uncovered.  
  9. To cook, boil pasta for 1 minute and 30 seconds.
And you're done!  I hope you enjoy your new-found ability to make great, homemade pasta!
Monday, June 25, 2012

Whipping Egg Whites: Kiwi Meringue Cookies

Hi Foodies!
Most people are baffled by the making of French meringue cookies, French macarons, and soufflés.  If you're knowledgeable in the realm of cooking, you've realized that all of the aforementioned desserts are made primarily from whipped egg whites!  Now why are people so apprehensive and afraid to cook things that involve whipped egg whites?  As you read on, I'll help to solve the mystery of egg whites by teaching you some simple, easy tricks to make sure that you reach stiff peaks every time!  And of course, being The Minimalist Chef, the recipe for kiwi meringue cookies that will follow the information about egg whites will be using as few ingredients, tools, and time as possible!

An All Inclusive Lesson on Whipping Egg Whites:
Egg whites.  A term that instills fear into even the most learned chefs.  Egg whites are actually quite simple to work with, as long as your know the proper techniques and make sure that your tools are impeccably clean.  I'm about to walk you through and explicate how to achieve the different stages of whipped whites.  Make sure your learning cap is securely fastened on your head!
Tools Needed:
  • A stand mixer, a hand mixer, or a manual whisk.  Any of these will work, however the amount of work required increases as you go down the list.  If you have a stand mixer, I highly suggest you use that, as it is the simplest and easiest to use.  I personally use a hand mixer, as I am The Minimalist Chef, and try to use only a few tools and ingredients at once!
  • A metal bowl (preferably copper), or a plastic bowl.  Make sure that these are IMPECCABLY CLEAN.  Any little bit of protein will inhibit your egg whites from whipping to stiff peaks.  Copper bowls are slightly acidic and help to stabilize the egg whites (I know, it sounds ridiculous, right?  But it actually works, trust me on this!  Just don't leave the whites in the bowl too long, or the bowl will impart a coppery, metallic flavor on your whites. Who wants penny-flavored meringues?).
  • Egg whites!
Clean all your attachments, or your whisk, and separate your egg whites from your yolks.  There are many ways of doing this, but the method that I prefer the most is to simply crack the shell over your bowl, and move the yolk from egg shell half to the other.  Slowly the egg white will separate and fall into the bowl.  Discard the egg shell and yolk in your sink.  Repeat this process for each egg.
Acidifying the Egg Whites:
Adding an acid to egg whites before you begin whipping them can keep your whites from over-whipping and keep them stabilized.  A few commonly used,  good acids for egg whites are:
  • Cream of tartar (my personal acid of choice)
  • A splash of lemon juice
  • Whipping in a copper bowl
Personally, I use cream of tartar to acidify my egg whites.  It really don't add any flavor to the whites, and is super easy to use.  Simply take a teaspoon of it out of the container and dump into your whites; this is so much easier than squeezing a lemon.
How to Whip Correctly:
To begin whipping your egg whites, turn your mixer on HIGH speed.  Move the mixer around the bowl, while simultaneously rotating the bowl.  Do this until you reach soft peaks.  At this point, if your recipe involves sugar, begin to add the sugar SLOWLY, a tablespoon at a time.  Lower your mixer to medium speed.  Whip until you reach glossy, stiff peaks.
If using a hand-whisk, follow the same technique as above.  However, it will take an extra 10 minutes or so; it will also be a great workout!  I know that when I've used a hand whisk, my arms are sore the next day.
The Foamy Stage:
The foamy stage is categorized by small bubbles that form on top of the whites after they have been whipped for a short period of time, maybe a minute.  Keep whipping!
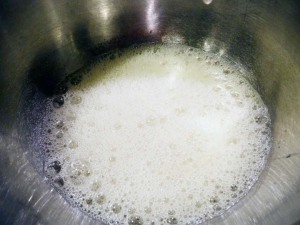
These are whites that have been whipped for only a minute or two. This is the first stage of whipping. Keep it up!
Soft Peaks:
Soft peaks are formed after the whites have been whipped for 3-4 minutes.  If you pull your whisk or mixer out of the whites, the "peaks" slowly fall back down.  They are categorized as white, shiny whites that form peaks that will disappear quickly. These are still not where we want our egg whites to be at!  Keep whisking.
These are a good example of soft peaks. You can see the small peak slowly falling down.
Stiff Peaks (Perfection!):
Stiff peaks are EXACTLY where we want our egg whites.  Stiff peaks are extremely glossy and resplendent, and keep their shape indefinitely.  When you take your whisk out of the whites, peaks should form on the whisk and in the bowl, and look almost like soft-serve ice cream.  They are stiff and perfect for everything that require whipped egg whites.  STOP HERE! Do not over-beat your whites.  I repeat, STOP HERE! These whites are PERFECT, and you definitely do not want to over-beat your egg whites.
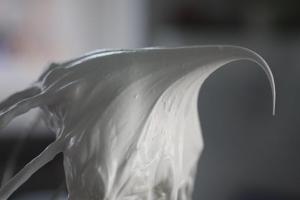
These whites are at the perfect consistency. They are at "stiff peaks." The whites are glossy, white, and hold their shape forever.
What Next?
Now that you've whipped your whites to stiff peaks, they're ready for any recipe!  If you're incorporating them into a French macaron, you're probably going to want to "fold" in your whites to the dry mixture.  Folding egg whites into a dry mixture or another ingredient allows the whites to retain maximum air trapped inside.  This keeps the egg whites stiff and shiny.
How do I fold?
Folding is actually quite simple.  To fold, grab your silicon spatula and slowly bring it around the circumference of the bowl, then kind of dump the gathered whites on top of the egg white pile in the center.  Repeat this process, turning the bowl each time to combine the whites with the dry mixture.  This will allow for maximum air retention.
This picture excellently shows the progression of folding whites into a batter.
I hope that this post has really helped to resolve the enigma that are egg whites.  Many people are so afraid to cook with them, but they're really not that hard to use!
Okay, now what?  Is there a recipe that I can use to test my new-found abilities?
Yes!  I have prepared for all of you foodies a blissful kiwi meringue cookie recipe.  This recipe is SIMPLE and fast (aside from the 2 hours of baking!).
Kiwi Meringues:
INGREDIENTS:
  • 3 Egg Whites, separated from the yolks
  • 1 tbsp Cream of Tartar
  • The juice and pulp of one kiwi, mashed
  • 1 Cup superfine white sugar (also known as castor's sugar)
  • A baking sheet lined with parchment
  • A plastic bag
Procedure:
  1. Preheat your oven to 225 degrees. Separate your egg whites into a bowl, preferably copper if you have.  Make sure the bowl is CLEAN!  If there is even a speck of protein or yolk, the whites won't form stiff peaks.
  2. Add your tablespoon of cream of tartar to the whites.
  3. Whip your egg whites to soft peaks.  At this point, add your superfine sugar 1 tablespoon at a time.  This keeps the whites from collapsing.
  4. Once at stiff peaks, add in the juice and mashed pulp of 1 kiwi SLOWLY.  I put mine in one tablespoon at a time to prevent the whites from collapsing.  The egg whites are EXTREMELY delicate at this point, and one mistake can be the end of the whites.
  5. Open the plastic bag and position it over a tall glass.  Slowly spoon your meringue mixture into the bag towards one corner, being careful not to break the stiffness of the whites.  Cut one corner of the bag and slowly pipe the meringues out onto your parchment paper, about a half-dollar in size, half an inch apart.
  6. Bake for 2 hours and 15 minutes, or until a meringue doesn't stick to the parchment and comes off cleanly.  The middle should be delicate, with some chewiness.  The outside should be crunchy but still bite-able.
Our 3 beautiful eggs.
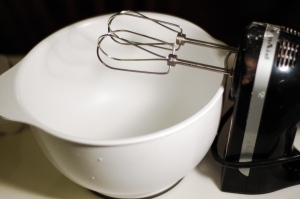
Clean bowl + mixer.
Prepped superfine white sugar.
Kiwi ready to be juiced.
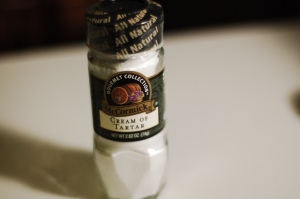
Our acid.
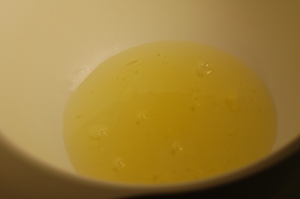
The whites after they have been separated.
Cream of tartar about to be added to the whites.
At soft peaks!
Adding the sugar SLOWLY.
After the last addition of sugar, we have stiff peaks! Perfecto! C'est magnifique!
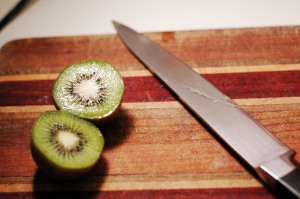
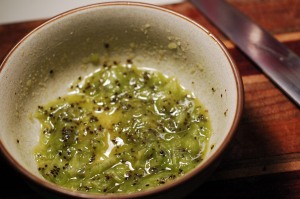
Mashed and juiced.
The plastic bag used to pipe!
Beautiful!!